Thank you everyone for such a wonderful reception to the Cowl Neck Dress pattern. We can't believe it. We can't wait to see your dresses and tops popping up in the wild.
Today we're going to go through all the prep you need to do before you can get down to the fun part, sewing your dress up. So we're talking choosing your fabric, gathering your supplies, sticking your pattern together and getting everything cut out.
So, to make your Cowl Neck Dress or Top, you're going to need:

- Cowl Neck Dress PDF pattern
- fabric (see below for recommendations and requirements)
- matching thread
- ballpoint needle
- twin ballpoint needle (optional)
- a selection of sewing supplies (pins, fabric and paper scissors, sellotape)
- sewing machine
- overlocker (optional)
- iron
Fabric recommendations
The Cowl Neck Dress pattern is designed for jersey fabrics. You can get away with a whole variety of weights, depending on the season. If you want something warm and snuggly, this pattern would totally work in a medium to heavy weight sweatshirt type knit, but if you're after something lighter, a lightweight jersey would work well - especially for the top variation.
If this is your first jersey project, we'd recommend starting with a stable jersey like a doubleknit or our roma ponte knits. Try to avoid anything too slinky or with too much fluidity for your first try, such as rayon jersey or anything with a high stretch percentage. You can find a selection of suitable fabrics on our online shop here.
Measuring yourself
Before you can work out exactly how much fabric you're going to need, first you'll need to measure yourself to determine your size. Tape measure at the ready!
Make sure you're not wearing anything bulky - for most accurate results you might like to do this step in just your underwear. For this step it's important that you wear the same bra you intend to wear with your dress once it's done.
When holding the tape measure around yourself you want it to be fairly snug against your body. Holding it too tight or too loose will give you an inaccurate measurement. Aim to fit a couple of fingers between your body and the tape, but nothing more. And we know this sounds obvious, but don't be tempted to hold in your tummy - after all the effort you've put into making the dress, you don't want to end up with something that you can't wear.
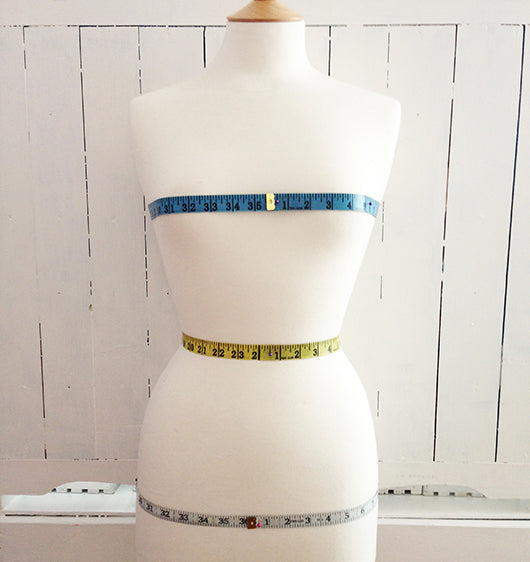
To find your bust measurement hold the tape measure around the fullest part of your bust - usually this is around the nipples. Make sure the tape measure is horizontal all the way around your back. If it dips down or is up too high your measurement will be wrong and you could end up cutting a bigger size than you need to. We recommend standing next to a mirror so you can check.
Your waist is usually the smallest part of your torso, and the point from which you can bend sideways. Hold the tape measure around yourself, have a little wiggle, and it should find its way into the right spot. Remember, no breathing in!
For your hip measurement you want to hold the tape measure around the fullest part of your bottom. This is not necessarily the fullest part of your thighs when looking at yourself from the front, so it's a good idea to stand sideways next to the mirror to see if you are holding the tape measure in the right place.
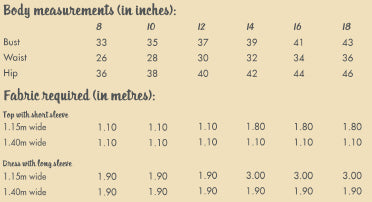
Once you've measured yourself and made note of your measurements, you can work out your size using the size chart below. Follow the column down to work out how much fabric you'll need based on which variation of the pattern you're making.
Prepping your fabric
There are a few things to remember when you're preparing your fabric for cutting.
The first thing is this: prewash! Especially important if you're using natural fibres such as cotton or wool, you'll want to get into the habit of prewashing your fabric as soon as you bring it home from the shop. Washing your fabric before you cut into it will ensure that you eliminate any shrinkage - and hence you won't be in the terrible situation so many of us have found ourselves in of having your beautiful garment shrink in the wash after just one wear. Knit fabrics such as jersey are more likely to shrink than woven fabrics so you doubly don't want to skip this step.
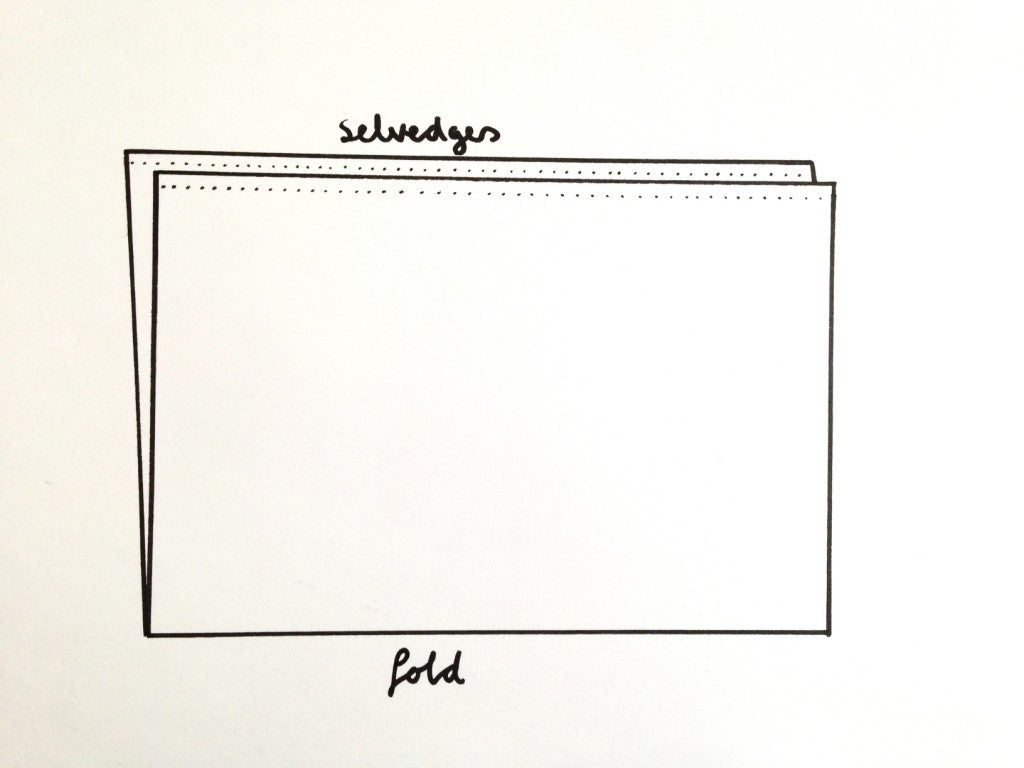
The second thing is that it's really important with jersey to pay attention to the grain of the fabric. Lay your fabric on the table, selvedge to selvedge, and make sure it's sitting flat. If you're working with a less stable jersey you might like to pin your selvedges together at this stage.
Printing your PDF pattern
If you're new to the world of PDF patterns, don't be afraid. They're amazing! You can buy a pattern and within a few minutes you can start putting it all together ready to be cut the same night. Dreamy.
If you've never used a digital pattern before and would like a bit of help, check out our How to Assemble Your PDF Pattern post for some advice.
Remember to cut out the right size pattern based on the measurements you worked out earlier.
Cutting out your fabric
Once you've got your pattern cut out, it's time to cut out your fabric. Eek!
Use the layplans to work out the best way to position your pattern on your fabric.
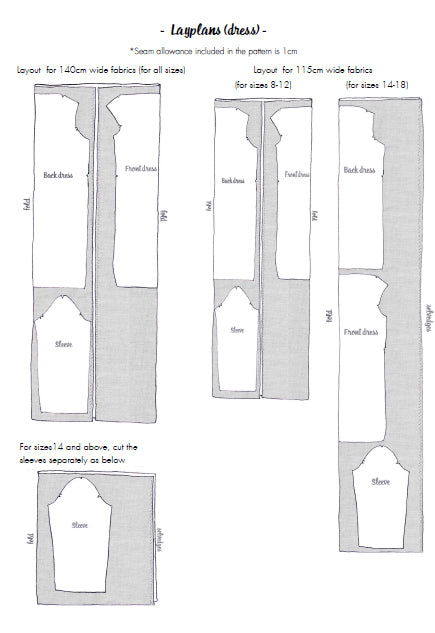
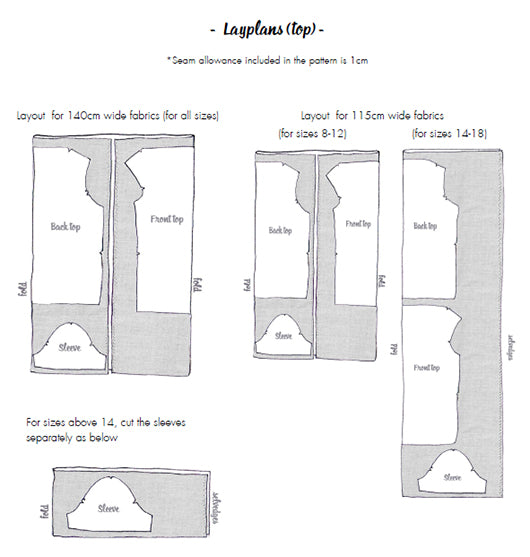
Pin your pattern to your fabric, paying attention to both grainline and fold lines, and then you can get snipping! Don't forget to cut all those notches - one short snip down the centre of the triangle should do it.
And that's it for today. In the next sewalong, we'll be starting to sew. Our favourite part!