Okay, all set? First thing's first, we have to prepare the sleeves - which means finishing the raw edges along the underarm seam. Using a zigzag stitch or an overlocker if you're feeling fancy, finish the whole length of the underarm seam on either side of both sleeves.
We're going to do some sleeve trickery now. To create the cuffs, we need to create a double hem from the lowest notch on the sleeve down to the bottom edge.

To do this, we need to snip a little bit further into the notch - a centimetre should do it. Don't worry about snipping through your finishing stitches, just go for it!

To create the double hem, with wrong sides together, fold the edge in on itself by 5mm, and then again another 5mm.

Give it a press before edgestitching in place, right along the edge, nice and neat.

Repeat this for the other side of the sleeve, and then again on the other sleeve. Whew!
Now, deviating from the instructions (check us out!), we're going to leave gathering the sleeve head until later.
We are however going to sew some gathering stitches on the cuffs. The Pussy Bow Blouse sleeves are quite loose and free, so we want to gather them up around the wrist so that they stay where they should be. So let's gather!
Gathering stitches are long stitches, usually sewn on stitch length 4 or higher on your machine. Depending on what we're sewing, we usually sew two or three rows of gathering stitches. For these sleeves two rows are fine, because the fabric is lightweight and should gather up easily.

Sewing between the circles marked on the pattern, sew your first row of gathering stitches with a 5mm seam allowance. Leave long tails on either end that you can use to pull on later. Sew your second row of gathering stitches at 1cm from the edge.
Don't start your gathering yet though, we're going to do that in a bit.
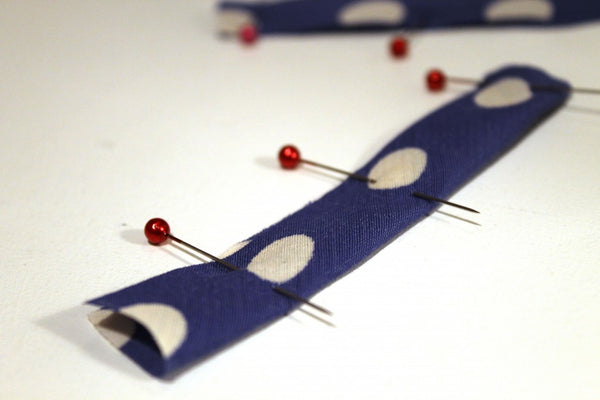
Right now we're going to make our rouleaux button loops. These are pretty as well as functional - they will help keep the cuff closed, and open so you can get your hands in. Always useful, that one.

Using those little bits of fabric you saved from earlier, cut a strip measuring 10cm long and 4cm wide. (If you're using a button larger than 2cm in diameter, you might want to increase the length.) This strip needs to be cut on the bias, which means it should be cut at a 45 degree angle from the selvedge.

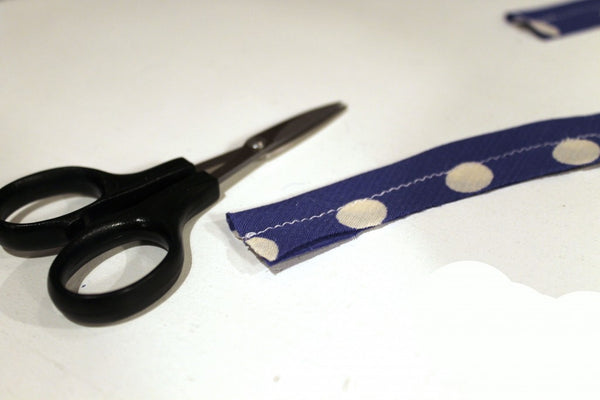
Fold your little strip in half lengthways with right sides together, and making sure your machine is set back to a standard stitch length (about 2.5mm), sew with a 1cm seam allowance.

Trim the seam allowance down to 5mm to help reduce bulk and make your loop easier to turn out.

Using a rouleaux turner or a needle and thread, pull the little tube the right way out.
Once it's turned out, cut your loop in half to make two 5cm lengths.
Now let's attach them onto the cuffs!

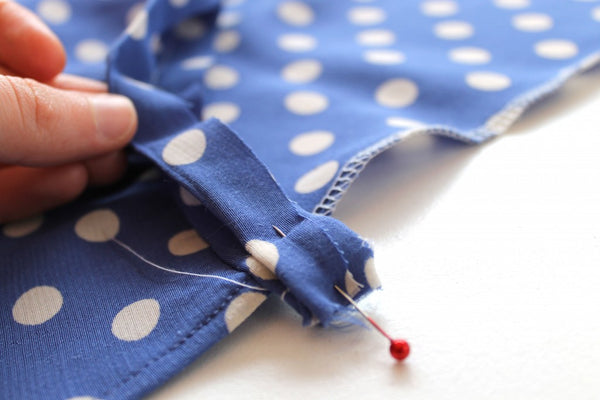
Place the ends of one rouleaux loop together and match them to the notch on the cuff, on the right side of the fabric. The loop should be facing inwards, with the cut edges of the loop flush with the edge of the cuff.

Staying on a normal stitch length, machine tack the loop in place using a 1cm seam allowance. This will ensure it doesn't wander off anywhere whilst we get to the next bit!

Taking the cuff piece, with wrong sides facing, fold over the unnotched long edge by 1.5cm and press.
Repeat these two steps for the other cuff.

Using the gathering stitches we made earlier, gently gather up the sleeve hem slightly by pulling on the long thread tails. You don't need to gather too much at this stage.

With right sides facing, place the long notched edge of the cuff together with the gathered sleeve hem. Match the notches and pin. Then, with the cuff extending from the sleeve 1.5cm at either side, pin these two ends in place.

Now adjust the gathers evenly to fit, and pin the cuff and the sleeve together all the way along.

Using a 1.5cm seam allowance, sew these two pieces together.
Press the seam up towards the cuff, being as careful as possible not to flatten your beautiful gathers. Repeat this step for the other sleeve, making sure the loop is on the opposite side from the first sleeve.
We're getting to the slightly confusing part now, so make sure you've got a cup of tea handy. (We always find tea helps us concentrate - maybe a biscuit too?)

To finish the ends of the cuff, we need to fold the cuff back on itself, right sides together. The edge you pressed up earlier should match the folded edge of the seam allowance.

Press flat and pin both edges in place. Perpendicular to the seam you have just sewn, stitch each end of the cuff with a 1.5cm seam allowance. The stitching should sit flush at the end of the cuff.

Trim the seam allowances down to 5mm.
Now you should be able to turn the cuff the right way out. Tease out the corners using a pin to get them nice and sharp.

Making sure the seam allowance stays pressed to the inside, fold the unstitched edge of the cuff over, wrong sides together. The fold should sit just over the line of stitching on the wrong side of the sleeve, and all the seam allowances should be hidden.
Carefully slipstitch the cuff to the sleeve (follow our Stitch School Tutorial here), sewing the hole completely shut.
And ta da! That's one cuff successfully attached and looking lovely! Now you just need to repeat the same steps for the other sleeve.
Next we will be inserting the sleeves into the blouse. How exciting!
As ever if you have had any trouble getting your cuffs to cooperate, let us know and we'll do our best to help.